I’m so in love with the idea of these babies: Tiny Tumbleweed Houses. I’ve been thinking a lot about my future lately- about my career and where I’d like to settle down once I’ve established myself as a real, God forbid, adult. *Shudder*. I was scoping out the prices of housing in my city, a place where there has been an ongoing housing shortage for quite some time, and I was shocked to see that most of the listings seemed, to my untrained eye, obscenely overpriced. So, I did a little homework and came to find that the average cost for a house in my province was $274, 485. Even if I get my dream job I couldn’t afford that and I’d be locked into a mortgage for 30 fucking years. Vomit.
So, a friend of mine sent me a Facebook message and I started scoping out these little pixie houses, Squeeee! You buy the plans from these guys, you get an estimate of what your materials cost and then you put it together yourself. Like a gingerbread house you can FRICKIN’ LIVE IN. Most of the estimated costs are under 50 grand, they’re environmentally friendly, there’s no room for clutter and junk (which, anyone who’s seen my car can tell you would be a refreshing change in my life) and there’s a range of sizes from itty-bitty (65 square feet– not really my cup of tea) to not-all-that-small (874 square feet– more in my comfort range.)
Yep, I’m gonna add this to my “Someday” pile, but considering how cheap it is, it might be considered for my “Someday Soon” pile.
My God, I could live here. And have planter boxes full of herbs, and raise my own chickens. Now, if I could figure out how to get it up into a tree, I’d be all set.
So, as you might have noticed most of my crafty endeavours come from necessity: I need cheap gifts for my chummily-wummilies, so I make bath bombs; I want a cheap beaded chandelier, so I give it a go. However, sometimes I just want to make something for the calming effect that comes from mindless crafting.
Before I introduce you to today’s craft I’m a-gonna let you in on the flaming bag of poo that was my day. In the midst of doing some major research for a school project that I’m thoroughly unprepared for, I got a call from Papa Pete reminding me that I had to renew my car insurance. Crap. That was a hefty bill I had conveniently forgotten about. But, “c’est la vie”, “que sera sera”, “amor fati”—one of those has got to be used correctly. So, I added that to my mental checklist of things to do, and carried on with my day. However, my mental checklist had other plans and decided to spin wildly out of control and go on a rampage without my consent. While driving through our fair city, a pebble, which I’m convinced was a tiny, concentrated lump of evil, was spat up from the truck in front of me and felt the need to make friends with my windshield. Within the 20 minutes it took me to drive home the misleading chip had turned into a full-on snap-crackle-and-popping, visibility hindering beast of a chasm that had cleaved its way from one side of my car to the other and straight through my wallet. Fucking awesome. Add in a rip in some much-beloved jeans, the fact that the rent is due, some heartburn and a cut finger and you’ve got yourself a asshole of a day. I know, I’m first-world-probleming all over the place, here, but goddarnit, did it have to happen all at once?
Damn touch screen
Just as I was about to have a vicious weepfest, I remembered a quote that someone awesome once said: “When Life gives you lemons, thank Life profusely because you didn’t have any lemons and can’t find them at stupid Sobey’s.” The awesome person that said that, my friends, was me.
I put my nose to the grindstone, hopped on the “Gettin’ Shit Done” train and punched my to-do list in the face. I scheduled the remainder of my day for some non-stressful, cheap craft time and some instant happiness (aka True Blood).
I headed out to the nearest Dollarama and found some cute little ceramic piggy banks. I figured since I needed to start saving my pennies to put towards my crack problem (might not want to say that in public) I’d get a few and jazz ‘em up.
Supplies:
4 Piggies- $4
Paint- On hand
Imagination- In head
Money to put in piggies- AWOL
Mario Piggy Bros:
I'll be playing Wii Wii Wii all the way home.
Piggy Link:
From Oink-arina of Time
Can't forget the hero sword.
Van-Gogh Piggy:
"Paint your palette blue and grey..."
Missing an ear, are we?
I think I’m going to start a collection of these things. I can see a Piggy Elvis in my future, Piggy KISS, Piggy Batman, Piggy Darth Maul… my God, the opportunities are endless. Now, if I could only find something to put in them.
Like That Crafty Bitch? Feel free to subscribe by email or share posts with your homies 🙂 You can’t see me, but I’m wiggling my eyebrows in a very convincing way.
So, the hunt has begun for my very own big-people-apartment. After 7 years of shared bathrooms, divvied-up cupboards, and roommates, I’ve begun looking for my very own place. I’m not complaining—personally, I think I rather lucked out on the roommate front. But, I need a real home, a place where I can cook naked and let my fuzz-beast run around like the wild-sock murderer he is. Without a properly ferret-proofed home he must be confined to my bedroom. Look at him, he longs for the freedom that comes with chewing up the inside of boots or sleeping inside a couch:
So, I made a list of things that I’m going to have to buy for the new pad: couch, microwave, end tables, lamps, toaster, table and chairs, etc. As you can see, getting settled can cost a pretty penny, so I’m going to have to use some serious restraint when it comes to purchasing the decorative frivolities that I love so very much. So far, it hasn’t been going well. I got some cupcake sugar bowls yesterday (although, to be fair, they were a present from my boyfriend who I have dubbed with the very manly moniker of “Panda”), a new duvet cover, some curtains, some embroidered towels– the bill is starting to run a little high for things that serve no practical purpose. One thing, however, that I really wanted, was one of those cute decorative chandeliers to hang over my bed. I tried a little online shopping and found that they are, for the most part, super expensive. I cannot justify shelling out $100 dollars on a mini chandelier that gives off no light and is purely decorative—I did find one however that was the size and shape of a pinecone for $59.99+ $30.00 for shipping. What a steal! :S
I got on the crafting-pony and rode all over the interwebz looking for help and came across this site. I love that someone took the initiative to put one of these puppies together. It was super cute and just what I was looking for, but when I ventured out to collect supplies I found that there was not a wire hanging basket, nor mardi gras bead in town. All I could find was faux pearl necklaces and for 10 dollars a pop I might as well have sprung for a fully functional, crystal fixture.
I was ready to give up on my treasure hunt but I remembered that in a pinch crafty bitches pinch back. I figured I’d go balls to the wall and try my hand at making one from the ground up, and while it was a lot more time consuming, I’m sure, than using pre-strung beads, I got more of a say over how I wanted it to look. I figured I’d share with y’all 🙂
Step 1: Collect Supplies
Fishing Line- I found in a drawer
Beads- $3 (on sale) for a pack of 550 at Michaels, I bought three packs
2 Soda Cans- liberated from Panda’s bag of recycling
Crafting wire- I had on hand
Ribbon- $1 for a spool at the Dollar Store
An old necklace- I used the pendant as my dangly-bit and the chain to hang my chandelier, if you don’t have a necklace like this, you can get chain at hardware stores and find a perfect finishing-piece at most crafting stores.
Legos are Optional
Step 2: Take your Tops off
You want to cut the tops off your soda cans—this is the easy part, just be careful you don’t cut your little fingies, my gems. Next you want to cut the centre bits out of the soda can tops- one should have a quarter sized hole in the middle of it so there’s enough flat surface to hold a small, battery powered tea-light, and one top should have the entire middle taken out leaving just the rim. I will from this point forward refer to these as Hole-Top and Rim-Top (creativity at its finest). The cutting can be a little bit tricky, but for the record I found that diet Coke cans have the thinnest metal.
Step 3: Create a Wreath Loop the wire around a salad bowl to keep it round.
Step 4: Create a Skeleton
Attach four pieces of wire to Rim-Top and the wire wreath. This will give you some support as you start to add your beads.
Step 5: Start Beading Tie one side of a piece of fishing line to Rim-Top, bead the line, and tie the other end to the wreath. And I cannot stress this enough: Double knot everything. Do about 20 bead-strings to start off with. Make sure that they all have the same amounts of beads, otherwise you’ll have a wonky, lop-sided chandelier. I used about 22 on each string, but it depends on what sized beads you have.
Step 6:Make a Wire Crossbar
Make sure that it’s tight enough across the Rim-Top that it won’t move around. This will be what you hang your masterpiece from and it’s got to be sturdy. I attached the chain from an old necklace then tied the whole thing to an open dresser drawer handle so I can work on it while it was hanging.
Step 7: Add Your Pick-Up.
You’ll need to tie fishing line from Rim-Top to Hole-Top, letting Hole-Top hang a couple inches below the wire wreath. Step 8: Cut Those Wires
Once you’ve got about 20 bead-strings attached, it’s time to cut your skeleton wires on the inside. When these are gone your whole chandelier will be supported by nothing but bead strings and you’ll find it looks more even.
Step 8: Bead Until you Think you’re Face is Going to Melt Off
In the same way you’ve been beading the top, add bead-strings to the bottom part of your chandelier. Take a piece of fishing line, tie it to Hole-Top so it leaves two long ends. Bead these with about half as many beads as you did for your top half of your chandelier, then tie it to your wire wreath. Repeat. Continue with adding bead-strings to the top part of your chandelier, as well, until you think it looks full enough. This is the part where you turn on Pretty Little Liars and fantasize about Ezra Fitz reciting Yeats to you before he ravishes you for hours upon hours. (Side-Note: Sorry, Panda!) Step 9: Your Dangly-Bit Once you’re done beading, tie a piece of fishing line to the centre of your crossbar on the top of your chandelier and let it hang down through the middle of the entire structure. Add something that gives the whole thing an extra bit of sparkle—I used a pendant. Step 10: Add your Bits and Bobs
Glue some ribbon around the wire wreath to cover up all the bits of sticky-out fishing line. I added a bow on top of my chandelier which is completely optional.
Step 11: C’est Fini
Be amazed at creating a piece of unadulterated beauty for under 20 bucks, then sit back and revel in your ingenuity and overall fabulousness.
In this crazy world filled with havoc and bedlam, there are not always many consistencies in one’s life. The span of one short day can turn any situation on its head, but in this “misshapen chaos of well-seeming forms” there are a few things that I’ve learned to depend on:
1. Put your tattoos in places you don’t see everyday, that way you won’t get sick of them.
2. Honesty and kindness might seem like the greatest traits you can possess but if you’re creative and charming you can weasel yourself out of any situation.
3. It doesn’t matter how down and out she seems, Madonna will come out with a new album and it will be amazing.
4. McDonald’s drive-through will fuck you over at any chance they can– See The Bitchionary for The Bottomless Burger.
5. Learn to master a piping bag and you can take over the world.
Don’t know what a piping bag is? It’s this majigger. Basically it’s a beauty-izer. Because, realistically, you can spend all day make a scrumptious meal, dessert, or pastry but no one will want to eat it if it looks like a steaming mound of crap.
I usually like to take a cue from Ms. Cardigan’s father (still don’t know who Ms. Cardigan is? Check out the Bitchionary) who taught us to drop a piping bag bomb on our twice-baked potatoes but I was recently invited to a baby shower so I thought I would take one of my grown-up tasties and tweak it enough to make more of a “family-fun-for-everyone” type deal. So here goes:
We’re all familiar with the infamous chocolate covered strawberry. A staple at valentine’s day, it’s a delectable little treat that has become so entwined with ideas of rolling in the hay that it sadly hasn’t gotten a chance to break into the world of G-rated snacks.
What you’ll need:
– White Chocolate Chips (or yogurt chips if you can find them. In fact if you can find them, can you let me know? For some reason I could only discover websites that would let me buy them in 20 pound quanitities… also the pet store sells them as rat treats but that is clearly not an option).
– Milk chocolate chips
– Strawberries (Cleaned, with stems left on)
– Blue or pink food colouring
-Piping bag (if you don’t feel like buying a fancy-dancy one, just snip off a small corner of a zip lock baggie)
-Waxed paper
-Toothpicks
Melt yo’ white chocolate chips in a bowl over a steaming pot of water. You can melt directly in the bowl but if you’re anything like myself you get distracted by shiny objects and have a tendency to let things burn.
Dip strawberries into the melted chocolate. I like to use a toothpick as a sort of support beam as I’ve found that using the stem as a dipping apparatus usually means having to dive face and eyes into a scalding pot of chocolate in order to fish out one sad, stemless piece of fruit. (P.S. Sorry there are no actual pictures, I was covered in sticky chocolate at crunch-time and didn’t have my camera on me.)
Photo Source: dippedfruit.com
Set strawberry down on waxed paper. Repeat this for the remainder of your berries and pop into the fridge to chill out and get stiff (was that meant to be dirty? We’ll never know, will we?) Again, I have no pics of my strawbabies hanging out in the fridge, but here are some tuxedo ones I made a few weeks before:
Just for the record, that is not my Coors Light in the background-- Ick.
Once your strawberries are good and hard take some excess melted chocolate and add a couple drops of blue or pink food colouring (or yellow or green, whatevs, I’m not trying to stuff your kid into a societally designated gender role, pft). Fill up your piping bag with your chocolate and drop tiny beads in a circlular shape on the front of your strawberry, giving it a tiny hat-thingy that youngsters are forced into. Then add a little bow.
Melt a small amount of milk chocolate (seeing as it’s a couple spoonfuls, you can just nuke it rather than wash another pot) and add little sleepy eyes and noses.
Voila, you’ve got strawbabies! Quick and dirty– just the way your mom likes it. Whomp, whomp.
So, I’ve been doing a lot of my Christmas shopping lately and as I’ve been wandering through throngs of people (seriously, don’t you people have jobs or families to go to?) and sifting through shelves of all the useless shit that’s piled up in the big box stores of this city and I’ve come to a realization that some of you little fruitcakes might have already had: Christmas gift shopping sucks. I know what you’re thinking: “But, Oh Crafty One, it’s only November, it can’t be that bad!” But it is… it’s worse. I like to spend most of my Christmas holidays not wanting to hang myself from the rafters with a piece of tack-licious tinsel garland, so I stay out of stores by getting all my gifts early. However, I think I might be giving away too many of my secrets because it seems the masses have figured out my ploy and followed me, Pied-Piper-style, to Walmart and beyond.
So, what is a Crafty Bitch to do when you want to please your friendly-wendlies and loved ones and not kill your fellow shoppers in the process? Why, you just whip together some hassle-free treats, stick on a gift tag, and call it a day.
One of the most underrated treasures in the world is homemade gifts. Think about all the absolute crap you’ve gotten in your lifetime and how much it actually meant to you. If I could take all the shitty teddy bears I’ve gotten in my life and get them together, I wouldn’t have a teddy bear picnic, I’d have a teddy bear bonfire. I don’t know about you, but I’m at a point in my life where I don’t need any more junk, and so are most of my friends, so why should I be throwing away tons of my hard-earned money at the mall finding that perfect something when my pal-ios probably already have two of them, or they never wanted it in the first place. I’ve said it before, and I’ll say it again, the most valuable thing you can give someone is your time, so why not put together a few time-filled goodies.
Bath Bombs These are super easy to make and I love them because when you throw them in the drink with ya it’s like soaking in a big glass of champagne.
They’re also awesome because you can lie and tell people they took you all day and they’ll believe you (Remember: The best relationships are built on a foundation of lies).
Ingredients: 1 cup baking soda: I say sodium bicarbonate because it helps me remember baking soda, not powder. Also, it makes me sound like a fancy scientist: “Hmm, yes, I need some sodium bicarbonate for cleaning my flatware… AND MY DEATH RAY”. You can get this anywhere, I like Bulk Barn because it’s cheapy-cheapy and I can pick up a shit load of candy while I’m at it.
1/2 cup of citric acid: … or as I like to call it– Waldo, because it can be pretty hard to find. Here’s a few little tricks to finding it though that I didn’t really think of when I went out a-lookin’: Know what it looks like: (I put a tiny wind-up Santa next to it to give you an idea of how big it should be. Then I realized that tiny Santa’s aren’t exactly a universal measurement, but fuck it, I’m not taking the photo again.)
Secondly, you’ll probably be asked what citric acid used for just so they’ll know what section of the store to find it in. The answer is- It should be everywhere, but it’s usually nowhere. It can be used in small amounts as an additive to jams and jellies so it could be found in the canning section of Walmart, it’s also used to ripen cheese so it might be in your local health food or cooking supply stores, also, you can use it to cut heroine so you might try asking your local drug dealer. Just joking, smack is whack. Anyway, I thought I could just go out and ask some nice helpful salespeople and someone would have an idea. However, most people looked at me like I was trying to build a bomb. Which I was… a bath bomb! (Just FYI, it’s probably not a good idea to use that one to said suspicious salespeople.) After 2 Walmart`s, 4 Shopper’s Drug Marts, 2 Dominions (brawl with rude customer service lady thrown in for free), and 1 Sobey’s, I had a stroke of genius that involved calling around before heading out. Of course the first place I called was a wine making supply store that had tons of the stuff. So, I’d look there first. If you’re okay to wait, I’d recommend checking out Ebay or the Brewery Lane’s online store, Clickabrew, which is the store I got mine from.
2 teaspoons of cornstarch
Easy enough.
4 teaspoons of grapeseed oil If you don’t know what grapeseed oil is it’s because it’s been camouflaged next to the olive oil at the grocery store for all these years.
A few drops of food colouring I use neon food colouring because I’m wild and craaaaazy.
A few drops of fragrance You can get these at Michael`s or any place with soap making supplies. I’m not usually one who heeds all the warnings but I’ve heard that you must use soap fragrance as candle scent can irritate you body when added to a bath and I always abide by such disclaimers when my hoo-ha is involved ;).
Extras There are a few extras you can add to your bath bombs, such as vitamin E oil, but really you’d just be spending money to gild the lily. Some people add sugar, sprinkles, or candies, but apparently these peoples’ mothers didn’t teach them about the pitfalls of women’s health (Thanks, Ma!).
Instructions (Make sure you pay attention, it’s real tricky) 1. Mix wet ingredients in a cup (this batch is grapefruit flavoured, in case you were wondering).
2. Mix dry ingrediants in a bowl.
3. Add contents of cup to bowl.
4. Smoosh. Throughout your smooshing process you will need to add more oil, just keep going until you get a sticky-ish consistency– enough so when you shape it it doesn’t fall apart. Don’t worry if you go a bit overboard, as long as you don’t turn it into bath bomb-slop you can even it out with more baking soda. P.S. You will love how your hands feel after this– soft like buttah.
BAM! you got your mixture. Use anything you want as a mold- ice cube trays, chocolate molds, plastic Christmas ornaments, it’s all good.
I like the little bubble containers you get from gumball machines. Pack it hard (that’s what she said) then extract from your mold. Again, if they are a little powdery or oily just let them sit for a while to harden up.
Don’t be afraid to mix and match colours, some of my favorites are pink and green melon scented, and white vanilla paired with orange tangerine to make cream-sicle.
Put them in baggies, throw some straw or ribbon on it, and give them to all your smelly friends 🙂 .
Oh, and for all my homies reading this right now: Guess what prezzie you’re getting! And for all my friends that don’t like baths: aw well, maybe you’ll get something next year.
So, if you’ve been a keener on my blog you’ll remember that my friend Katie got hitched recently. So, many of you know, doing the bridesmaid’s shuffle includes more than walking down the aisle with your little bouquet of fleurs. It can be hard friggin’ work. Without even factoring in the tasks of holding the bride’s hair back as she heaves or trying to get her hard earned 50 dollar bills BACK from the undulating, male stripper, there are many steps involved in making sure that the bride’s last hurrah doesn’t turn into a snooze-fest. The one relief I had came from the only request Katie had for her bachelorette party: Please, no peens.
What I thought of as comfort later became a bit of a pickle (pun always intended). I realized man-bits are usually the go-to for every bachlorette and without that template, I can tell you now that we had a little bit of a stressful day trying to gather a booze assortment, buy/apply decorations, bedazzle t-shirts, whip up tasty delights, and plan activities. When my fellow bridesmaid and best friend, Ms. Cardigan, dropped her rum in the driveway and ended up crying hysterically while splayed out on the asphalt (I had to convince passer-bys that she wasn’t severely alcoholic), I realized that man-bits really are the easy out for a stagette. But, staying true to the bride’s wish (and because she has been such an accommodating bride, who really didn’t ask for much) I wanted to do something special for her. So we trekked on with our penis-less party and after a hung-over morning filled with Cake Boss marathons (you know you’ve been there), I figured a cake would be a a pretty surprise that lacks genitalia of any sort. So, I’ve decided to share with you some of my amateur fondant creations so you can DIY the guts out of your bachelorette party (and it beats the hell out of paying someone else to do it).
The Cake for Katie:
Fondant is just like Play-Doh for grown-ups, so just think about it as making many shapes and gluing them together (with water, not glue, because if you really are a grown-up you know that eating paste is for the weird kids). So here’s how to do it…
Easy as Pie… er… Cake
Make your cake. You’re going to spend a fair amount of time on fondant, so I would recommend a mix from a box. We don’t want to twiddle our lives away on measuring flour and other such foolishness. I opted for a Betty Crocker French Vanilla. The size and shape of your cake is up to you. I wanted to do a triple layer because I wanted an excuse to use my teeny tiny pan. After I had made the individual cakes and they had set enough that they weren’t doing all that steaming and crumbling business, I cut each one in half and filled it with a generous heaping of Nutella and sliced strawberries. Then I put it back together and “dirty iced” the bottom layer (thanks for the vocab lesson, Cake Boss!).
The Fondant:
Fondant is a pretty easy thing to work with, but it looks scary. Buy a big tub of it (got mine at the Bulk Barn) and say over and over to yourself “Do not be scared, this is just a cake. It’s only a baked good, I’m not performing open heart surgery”. Use your kitchen table (clean clean clean), with a nice little layer of flour. Knead in enough colour to make it vibrant, I choose flamingo pink, and roll it out with a floured rolling pin. When you think it’s big enough, throw it up over your cake. Mind you, the dirty icing will make it stick so make sure it’s positioned well before you set it down. Now, a lot of fancy, shmancy cake makers have a steamer that make for seamless fondant edges, however, I refuse to bust the bank for something I’ll only break out for holidays and special occasions, so I made some folds around the top corner using the natural sway of the fondant (kind of like how a tablecloth has natural folds when on a round table).
(BTW, check out my sick MS Paint skills.)
Add a band of fondant to cover the untidy fondant edges at the bottom of each cake layer.
Pump it Up
Fondant shoes are super cute, iconically girly, and easy to make in a few simple steps. You’ll need gum paste for these. I used Wilton’s Ready to Use stuff.
First, mix in your colour. And flatten ‘er out with a floured rolling pin.
Cut out the shape of a shoe-sole…
And the toe of it. You can gauge the size of the toe by tracing the tip of the sole and making it just a teensy bit wider.
And assemble using water as glue. Lean it on a piece of thick-ish paper so it’s got some slope to it and use a ball of plastic wrap to keep the toe rounded. Make a little stump out of the gum. Add as a heel.
Pop it in the fridge until it’s hardened (once it’s stiffened a little bit easier to work on- that’s what she said). Add gum paste ribbons or bows. “But, Crafty Bitch,” you say, “How will I ever make a bow?!” Well, my darlings, I will tell you!
Tying the Knot
Bows are super-duper simple and look elegant . They’re a little delicate so don’t Hulk-smash it onto your cake, but once you make a couple, you quickly get the hang of it.
Cut two “flower-petal” shapes out of flattened fondant (or gum paste, whatevs).
Fold each petal around a pen (wash the pen first, you filthy minxes).
When you’ve got two of these little pieces, stick the points together with a little water. Cut out a tiny rectangle of fondant to wrap around the centre of the bow, hiding the stuck-together-bit.
Cut out some slightly larger rectangles and attach like an upside down “V” to the main bow part. Cut tiny triangles out of the bottom of these rectangles, and, voila, you’re fit to be tied.
Shaken, not stirred
A party for dirty girls isn’t complete without a few dirty martinis. So I decided to stick some on the cake. For the olives, roll some green fondant into a ball, add a little red dot. Shove a toothpick through it and place on your cake. Voila!
For the martini glasses, use black fondant. Roll it out on a floured surface. Using a knife, cut out some triangles, then cut smaller triangles out from the inside of your big triangle. Add a stem of flattened fondant and use your small triangle for the base of the glass. Throw in a tiny green ball for a mini-olive. You should get something like this: (BEHOLD the power of MS Paint).
The End
Arrange your tiny fondant pieces around your cake at your preference. And if you’re wondering how tour party went: we stayed true to our word, there was not a twig-‘n’-berries to be seen. However, I must admit, I thought pretty hard about serving the cake on these napkins:
So, I used to have secret dreams of becoming a beret-wearing, cigarette smoking, beatnik artist. It would be nothing for me to pick up a shirt or two because, “I could see myself painting in that”. However, through my grown-up years, I’ve found that while the art we hear the most about is often wrapped in pretentiousness and snob-jobbery, most artists are not. The best artists are the ones who aren’t afraid to give up their secrets and let you experiment for yourself, a la:
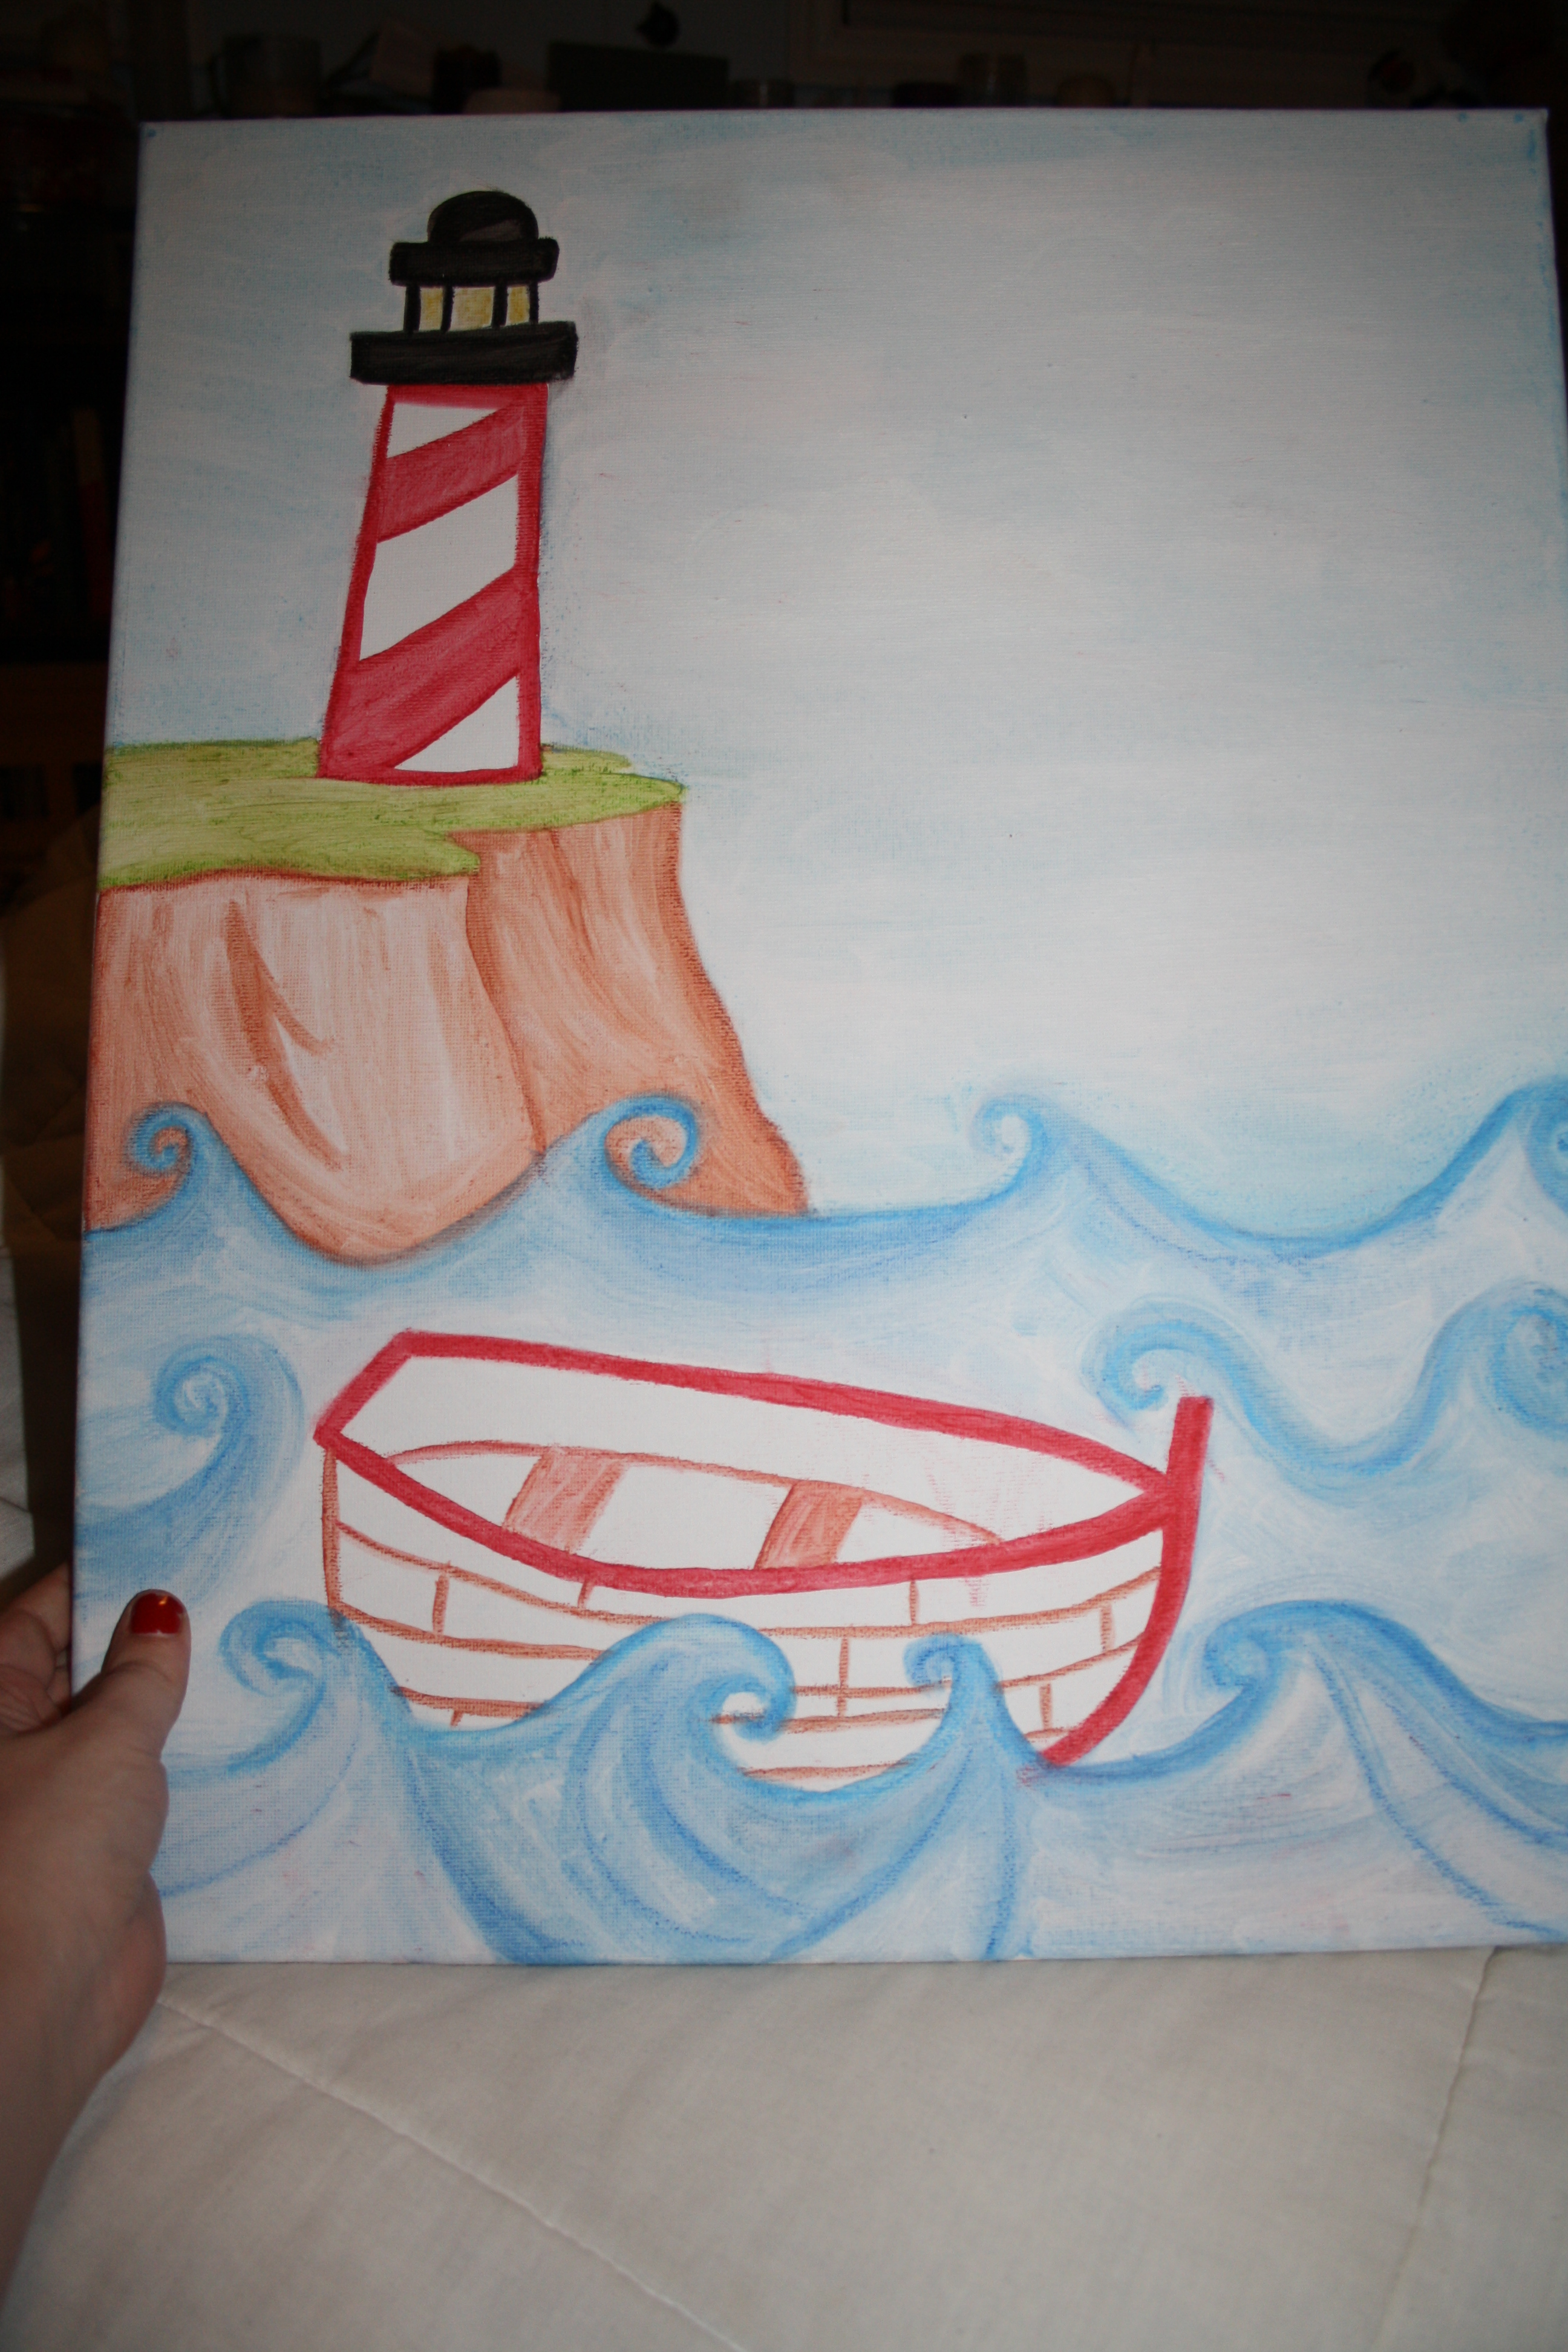
Ba-blam! Bob Ross is the man. Not only is his soothing, melodic voice the only thing I can stand on hung-over Saturday mornings, but he actually cuts the bullshit and tells you exactly what to do. Ex. Take your brush… put it in the titanium white, put it here on the canvas. Fabulous. I love a man who can talk about painting and not the “pain deep in my soul” (artsy fartsy types drive me off the deep end). So, I’ve taken a cue from Mr. Ross and figured I’d post up some instructions on making some cute “stick up on your wall” art. However, I’m going to let you in on a little secret about oil painting that no-one tells you: that shizz is expensive. And in my opinion a painting shouldn’t cost a hundred-gazillion dollars to be seen as an accomplishment. I’m not ashamed to say that I’m a cheap-decorator and I’d rather make my own artwork than hang up some swirls of paint from some chap I don’t know from my Uncle Ernie. So, here goes:
What you’ll need:
One piece of canvas. I prefer the stretched stuff because getting paintings framed is a major hassle, for which I have no time. “Gallary Wrap” is what fancy fuddy-duddies call this stuff 😉 You can get this at most craft stores but you could end up fiddling away your hard earned nickels. Walmart canvas is where it’s at. I got a pack of 5 for somewhere abouts 20 bucks.
1 bottle of paint thinner. You can get this anywhere. Mine cost me 2 dollars and will last me until apocalypse is upon us.
Assorted brushes. This is the only place I’ll ever tell anyone not to skimp. There’s no need to buy individual brushes because they’re usually expensive and often end up getting destroyed (maybe that’s because I paint like I’m at war) but a nice pack of 5 nylon ones will run you 5-7 dollars and you will use these for everything. Read the labels carefully, because stiff bristles will make your painting look like you did it with a rake. Take care of your brushes and they’ll take care of you. Although, I recommend not leaving them in charge of your children as they won’t take care of them.
Oil Pastels. Now, some arts stores are tricky and will tell you that these suckers can go for pretty expensive and then they’ll try and sell you the best that money can buy. I got these for a dollar at Dollarama and they are golden. Hoo-ah!
Step One: Print this. You may need to make it bigger or smaller depending on how big your canvas is. Or, eyeball it if you got drawing skills.
Step Two:
If you have printed the above, cut out the pink dotted lines.
Step Three:
Slap it on your canvas and lightly trace around it with a pencil. I say lightly because if you leave too much lead behind you’ll end up muddling the grey into your colours and everything will end up a hazy shade of Winter. After you’re done tracing you may have to add in a couple lines here and there that are un-traceable, like the lines in the cupcake cup.
Step Four:
Pick your colours and go to town with oil pastels. They work just like crayons. Try not to press too hard, because you don’t want itty-bits of crumbled pastel all over the place. If it’s not dark enough for your liking you can always go back and add more after the painting step. For the background pick a lighter colour pastel and use it horizontally on the canvas so you can cover a large area. I’d recommend applying a little bit more pastel in the corners, making it darker and giving your picture some depth.
Step Five:
Dip your brush of choice in your paint thinner and stroke along your pastels. Give it a go and don’t be afraid. I’ve seen my friend Marlena stare at a blank piece of canvas for what seems like hours, terrified to touch brush to canvas lest she make a mistake. This is not science, put down the rulers, people! If you think something would look good, throw it in there. I just put some circles in the background doing the same “technique”, drawing in oil pastel then painting over with paint thinner. This is your painting and it represents you. It figures that my favorite things to paint are tarts ;).
When you get into it it takes you a very short time to make one painting and you’ll get braver at free-handing. Here are a couple more I did:
Step Five: Stand back and marvel at your masterpiece which costs about five, fiddy. Sign your name and display proudly. Or, better yet, sign someone else’s name and tell all your artsy-fartsy friends you got it at auction for a c-note.
So, my friend Katie got engaged a while ago on a beach in the Dominican. I always assumed her wedding would go somewhat the same– on a beach on some tropical island, on a boat off the coast of no-where, by Elvis in the Chapel of Love under the bright lights of Vegas. However, once it was apparent her family, future family, and probably future husband weren’t too kean on any elopement theories they set their destination in a little place called Cow Head. I know, I know. However, you’ll be surprised to find that Cow Head is actually a beautiful little place.
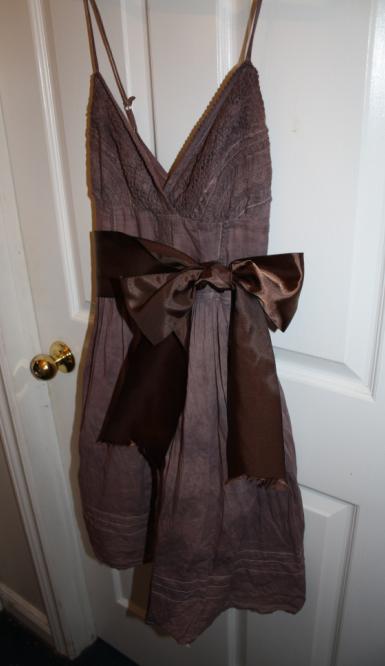
Now, here’s the catch. Try having a full and lavish wedding with an elopement wedding timeframe. Katie had about three months to plan and execute a dazzling display of love, devotion, commitment and all that other traditional foolishness. Understandably, brides who have months of planning and wedding planners at their disposal often end up in a tearful heap on the bathroom floor more than once. To me the term “Bride-zilla” is synonymous with “Just-trying-to-freaking-cope”. Granted, many matrimonial monsters are created out of the “me-me-me” attitude that has an overwhelming fear that everything won’t be perfect for “MY special day”. However, I suspect that many wives-to-be, my best friend Katie included, are afraid that their guests won’t have a good time, or that, they’ll have 50 years with the memory of a streamer and tissue paper nightmare of a decorating job. So, when Katie asked us all to pick out our own bridesmaids dresses, she was being a real peach of a bride. However, finding brown dresses to fit our four different body types and preferences was easier said than done. A week before the wedding Katie became the oh-so-gracious-one again and actually friggin changed everything around to accommodate us and what was available. We picked up some pretty purple dresses, but it got me to thinking that wedding attire in a pinch can be a real sticky sitch. Therefore, I have preplanned my bridesmaid’s dresses (for my imaginary wedding, of course). They’re a little bit granola, but they’re also inexpensive, hassle-free, and unlike every other bridesmaid’s dress in the universe, you can actually where them again (minus the sash).
Step One:
Buy a white cotton dress. These are easy to find and extremely inexpensive. I bought this one at Winners for 15 bucks. As well, while they may have a slightly different cut, most knee length white cotton dresses have the same look to them. So finding a number of them in an array of shapes and sizes is no problem-o.
Step Two:
Wash said white cotton dress. For the dying to work it needs to be clean and free of any dusty-bits that may be there from sitting on the rack.
Step Three:
Read instructions carefully (This may require taping them back together if you’re a savage at opening things like me).
Step Four:
Follow instructions and commence the dying sequence. Just a couple side notes, if your instructions say add salt, add lots of freaking salt. The last time I went a-dying I skimped a little and ended up with what I call my Jackson Pollock dress. Also, when the instructions say “Not for tub dying”, they are not kidding (see picture below for proof). Use a plastic bucket or something you can give the old heave-ho to after you’re done.
Step Four:
Once you’ve soaked your dress until it’s good and covered, let it sit for a little bit. The colour it is when it’s washed and finished will be muuuuch lighter than right now. So, wash it, let it dry and if it’s not the colour you’re looking for, give it another go.
Step Five:
Ad any pretty little embellishments you would like to make your dress look fancy. I bought this giant spool of ribbon at Michaels (or as I like to call it, Church of the Crafty), for 14 dollars. It has enough ribbon on it to make about 6 sashes.
Step Six:
Get all gussied up. Not too shabby for a dress that costs about 20 dollars.


